


A step-by-step guide to knitting the Pearl Blanket
Ever gotten halfway through a project and thought “Hang on, am I even doing this right?” We have 🙋♀️
That’s why we’ve created these step-by-step guides to walk you through the knitting process.
Even if you've never knitted before, we'll take you from zero to knitting hero in no time 🦸♀️
When it comes to knitting, practice makes perfect
Before we get started on the pattern we suggest you spend a bit of time learning the basic stitches you’ll need to complete your blanket.
The Pearl Blanket is a great beginner project and a cosy, snuggly couch buddy. She's made using a combination of garter stitch, stockinette stitch and dot stitch, and all of them are made using a combination of knit and purl stitches.
You'll want to be confident with the knit and purl stitches before you start 🧶 You'll also want to get a hang of tying a slip knot and casting on your stitches (AKA getting your stitches onto your needles) which is the first step in any knitting project, as well as casting off to finish.
You can use the yarn that came in your kit to practice with. Once you've got these mastered you'll find the pattern a cinch!
Total beginner? 👩🏫
For a more comprehensive lesson on the basics of knitting visit our Learn How To Knit page.
Onto the blanket!
💪 Remember learning a new skill can be a little challenging at first, and you’re bound to find yourself making some mistakes along the way. But as with learning anything, your brain and your hands slowly start to get the hang of it, muscle memory is created, and soon the thing you found tricky/daunting/scary is like second nature!
⚡️What you'll need
Your kit comes with everything you'll need to make your masterpiece. In your kit you'll find;
- 15mm needles
- 6 or 9 balls of Cardigang Chunky Merino Wool
- A darning needle
- Made by me tag
You also want to have a pair of scissors and a tape measure handy.
⚡️Sizing and measurements
You can make the Pearl Blanket in two sizes, small and large. Your pattern is read like this, small (large). Make sure you're following the right number to ensure your finished piece is the right size.
Laying flat, your finished blanket will measure:
Small: 90cm wide x 110cm high
Large: 1200cm wide x 1300cm high
⚡️Test your tension
Before you start your project, make sure your tension (how tightly or loosely your knitting is) is juuuust right 🥣 We do this by knitting a “tension swatch”. It's a bit like goldilocks, if the tension is too tight, your piece will be too small, and if it's too loose it may not hold its shape and might be too big.
Gauge: If done correctly, your 10x10cm knitted swatch should be 7 stitches wide and 9 rows high when knitted in stockinette stitch on your 15mm needles.
To test this, jump on your needles - use the yarn and needles that came in your kit. Cast on around 12-15 stitches, then knit in stockinette stitch (knit all stitches in your first row, purl all stitches in the next - repeat) for around 10-14 rows. Then measure a 10x10cm square and count your stitches and rows within that space to make sure you're knitting at the correct tension.
If you've got more stitches or rows than the instructions say you should have, your knitting is a little too tight, and if you've got less your knitting is too loose. Adjust your tension by holding the yarn a little more tightly/loosely as you knit.
💡 We know knitting a tension swatch can seem like a bit of a drain, but it's really important because the difference of a few millimetres in your tension can lead to a finished piece this is quite different in size to what you intended.
🧶 Let's knit up a storm!
Time to get click-clacking and whip up your cosy blanket.
We make our blanket in one (very) long piece, knitting from bottom to top. Get ready for this baby to keep you cosy and comfy while you're knitting it!
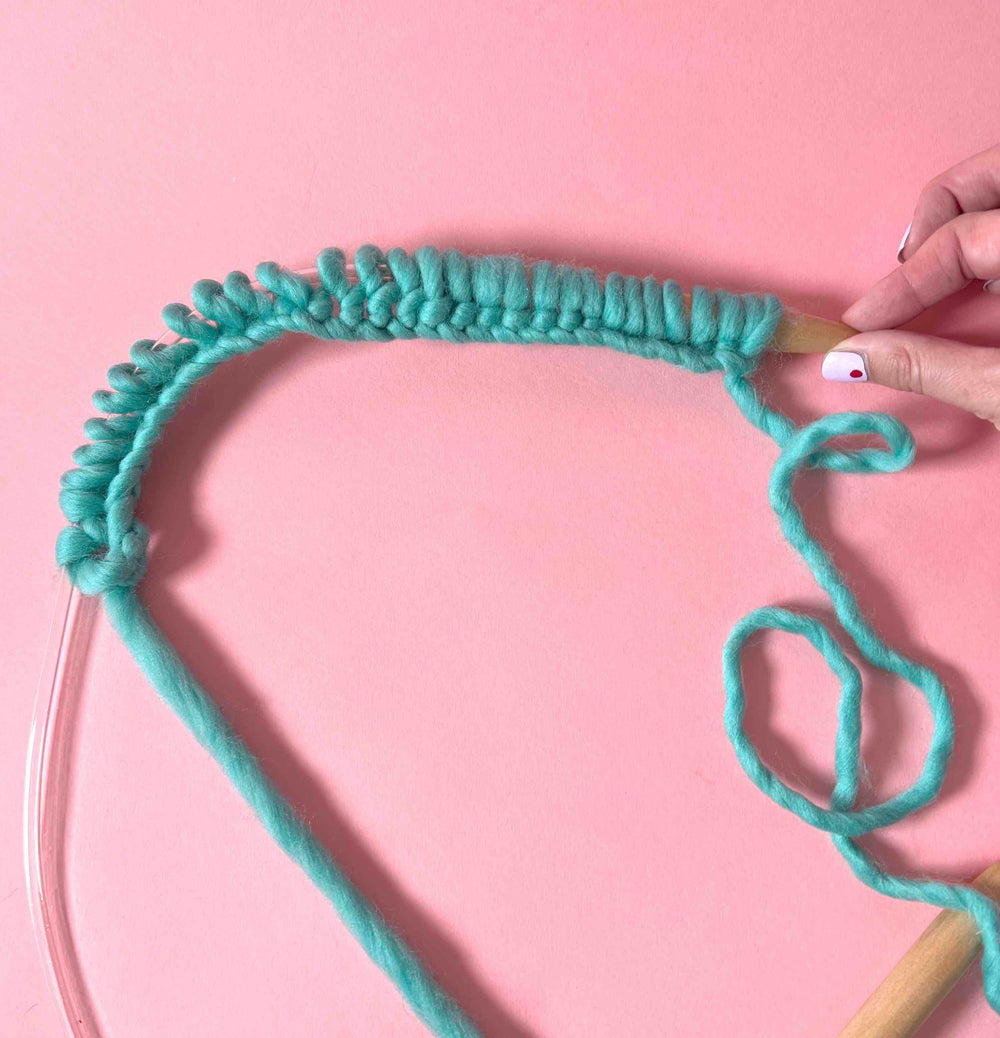
STEP 1: Cast on
First thing first, cast on your stitches. Your stitches will run onto the plastic tubing that connects your needles - that helps you squeeze the stitches on!
💭 Casting on, like many things in knitting, can be done in a number of ways so if you don't like the technique we suggested, you can pick any that’s right for you.
STEP 2: GARTER STITCH
You're going to start with 8 (10) rows of knit stitch. Garter stitch is the simplest stitch! It's created by knitting every stitch in every row - super simple hey?! 😎
STEP 3 to 11: BODY
Okay, now let's get into the guts of our blanket 🚀 We're going to follow an 8-row sequence to knit the blanket up.
The first and last 10 stitches of every row will always be knit stitches. This will continue the garter stitch border.
Rows 4 and 8 within the 8-row sequence are the ones we'll create our dot stitches.
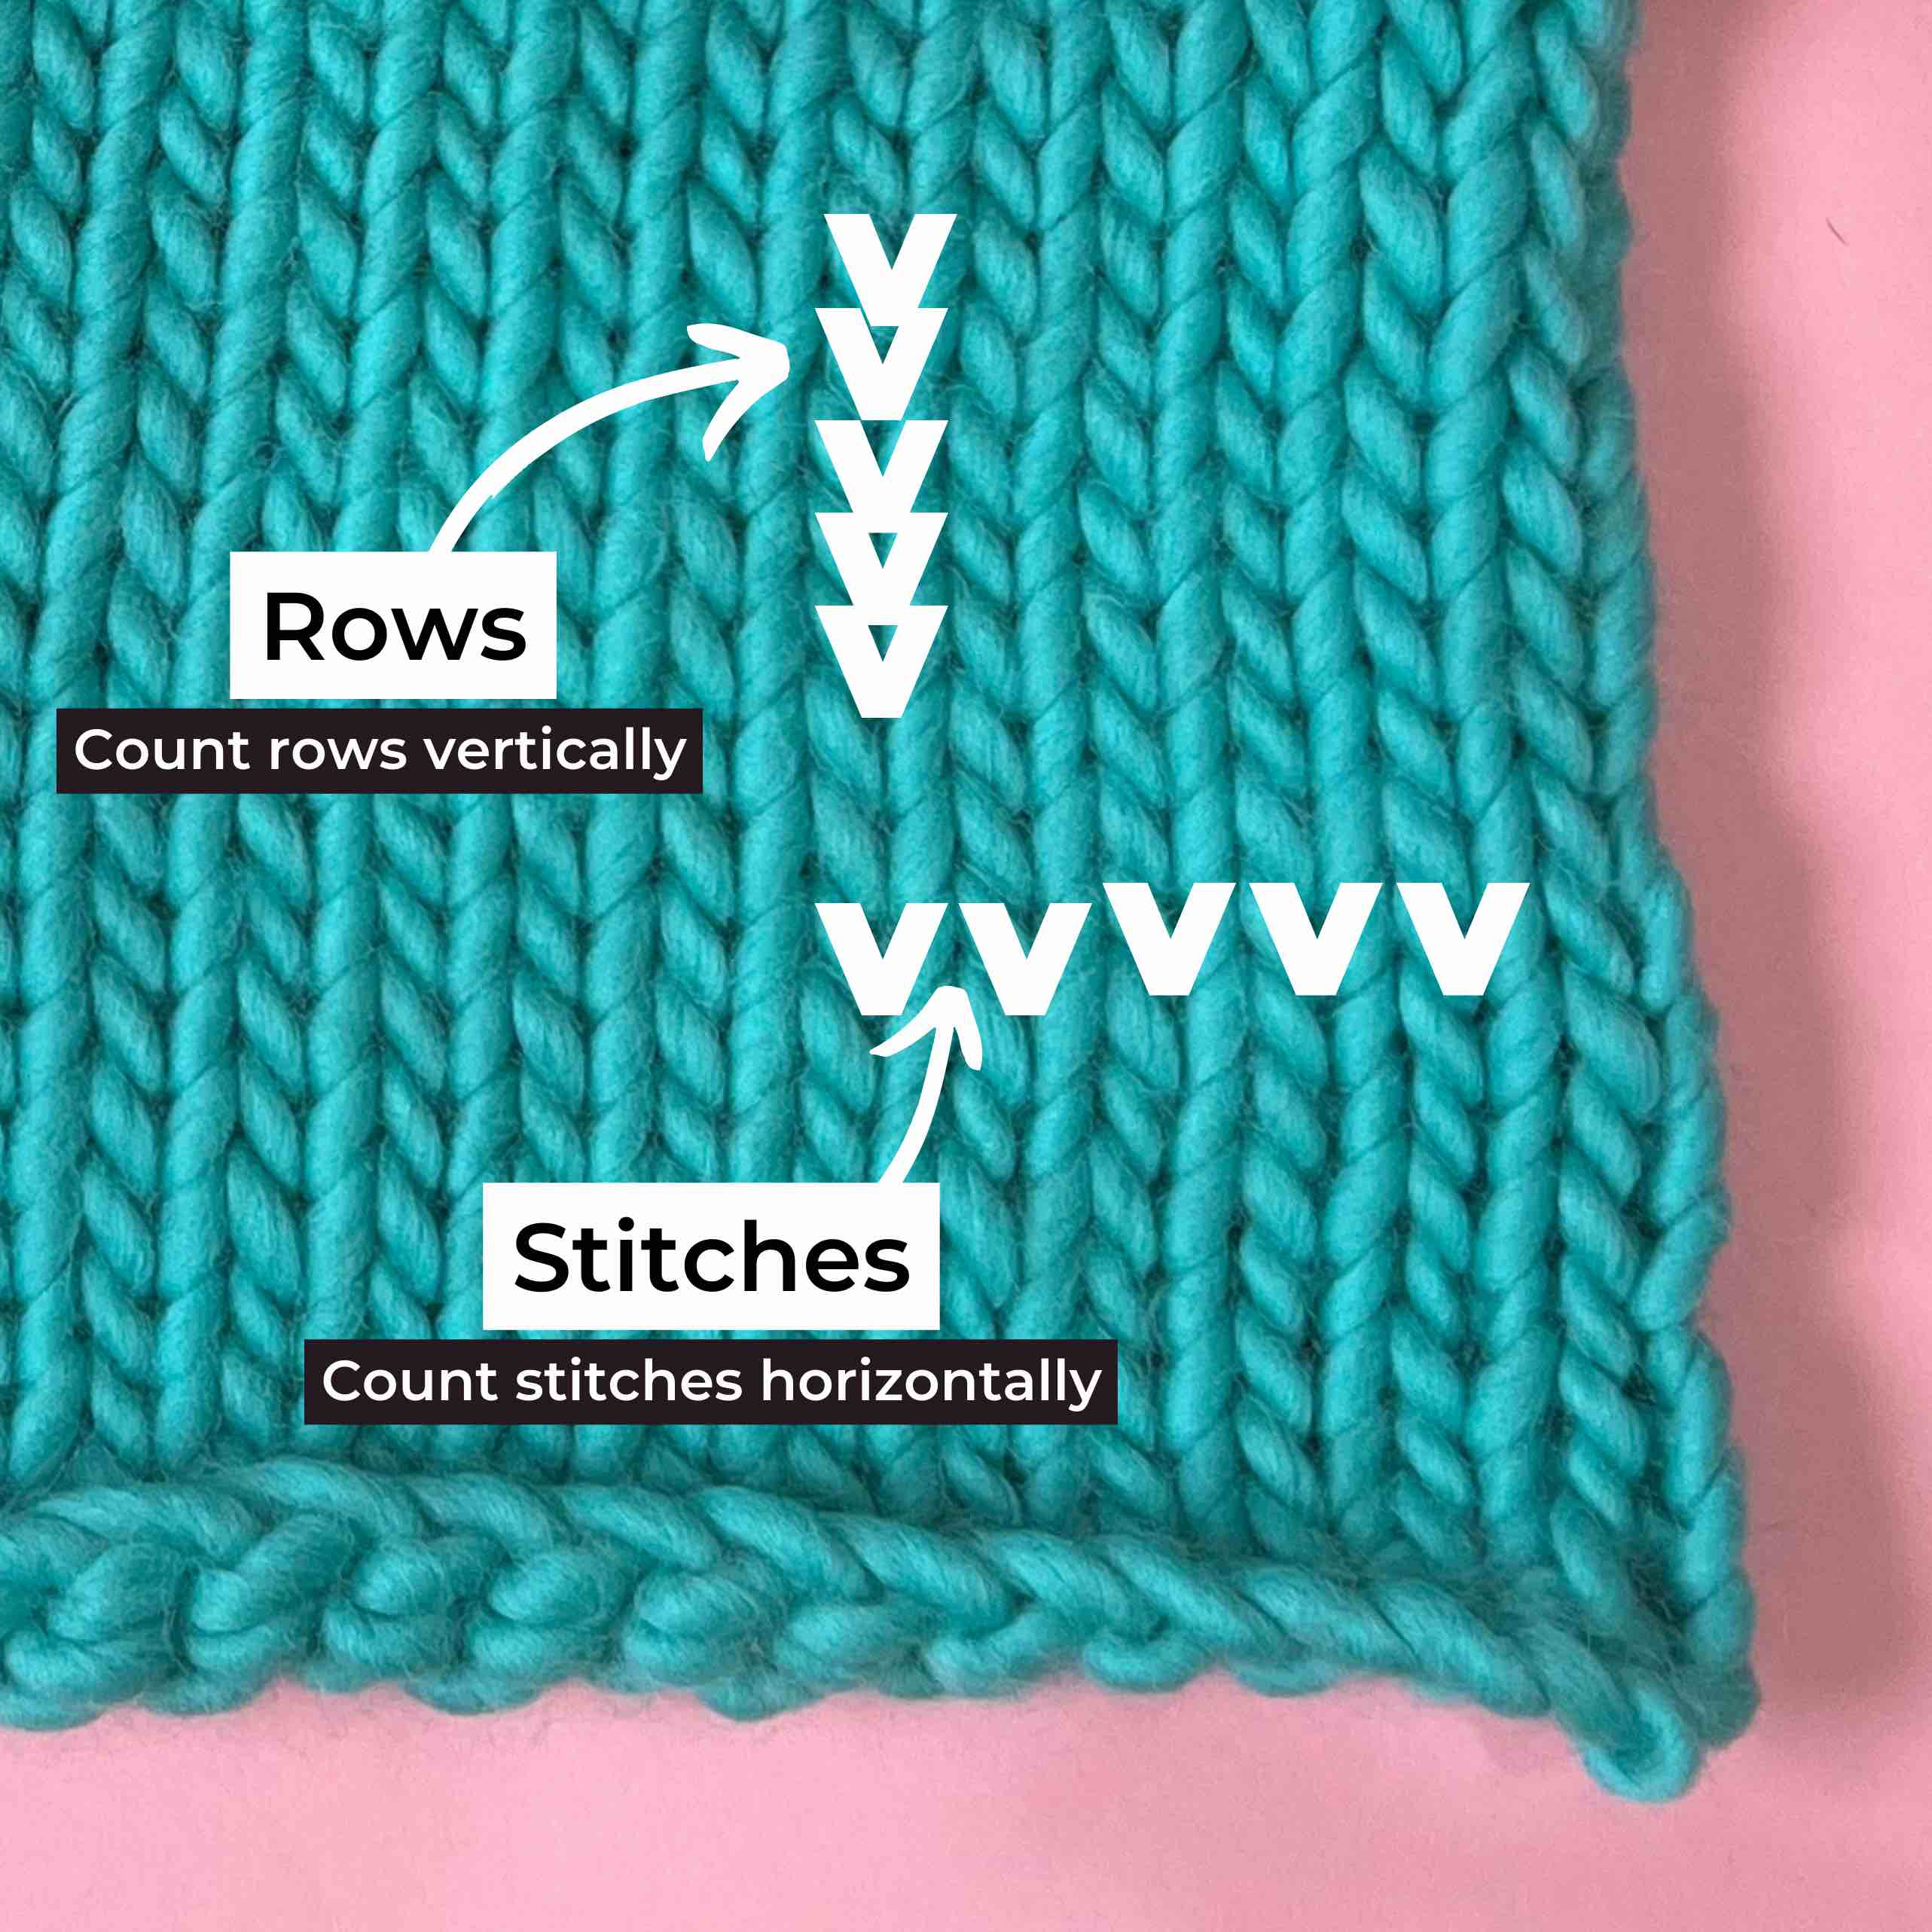
The other rows will alternate knit and purl rows which go together to create a stockinette stitch. Stockinette stitch is a basic stitch that most knitting patterns often don't explain! It's created by knitting one row and purling the next and the 'right' side of the stitch is the one with the V's facing upwards.
Let's dive in 🤿
Row 9 (11) (row 1 of our sequence): Knit all stitches.
Row 10 (12) (row 2 of our sequence): Knit your first and last 10 stitches and purl stitch in the middle.
Row 11 (13) (row 3): Knit all stitches.
💥 Row 12 (14) (row 4): Knit your first and last 10 stitches. In between, you'll purl 1 stitch, knit 1 stitch, purl 3 stitches, knit 1, purl 2 - repeat.
Row 13 (15) (row 5): Knit all stitches.
Row 14 (16) (row 6): Knit your first and last 10 stitches and purl stitch in the middle.
Row 15 (17) (row 7): Knit all stitches.
💥 Row 16 (18) (row 8): Knit your first and last 10 stitches. In between, you'll purl 3 stitches, knit 1 stitch, purl 3 stitches, knit 1 - repeat.
Repeat the sequence until you're down to your last ball of yarn. 🕺
STEP 12: GARTER STITCH
Let's finish with 8 (10) more rows of garter stitch. Damn, this blanket is looking goooood! 🔥
STEP 13: CAST OFF
✔️ Time to cast all your stitches off your needle.
When you cast off the second last stitch you'll be left with one stitch on your right needle. Cut your yarn from the ball (give yourself about a 25cm tail) and thread the tail back through the last stitch to secure it.
FINISHING
We're so close to being done! 🪡 Grab your darning needle, the final thing we need to do is weave in the ends so that all your yarn tails are hidden back into the blanket.
D.O.N.E! You've finished your blanket, well done! Epic work 🤩 If this was your first-ever knitting project or one of many, we hope you had a blast click-clacking and making your bangin' blanket 💥❤️
In a bind and need some help?
Book in for a 15min one-on-one knitting or crochet session with the Cardigang Hotline ☎️. Whether you're just starting out, or you've got a specific question or problem (dropped a stitch, no stress!), we're here to get you out of a bind.