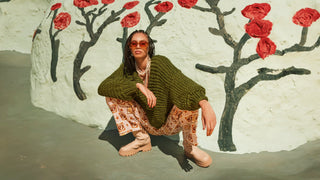
A step-by-step guide to crocheting the Daphne Jumper.
Ever gotten halfway through a project and thought “Hang on, am I even doing this right?” We have 🙋♀️
That’s why we’ve created these step-by-step guides to walk you through the process.
Don’t let the fancy French name put you off. Even if it’s your first foray into crochet, everything’s going to be ok with our step-by-step tutorials.
When you first look at a crochet pattern it can be pretty overwhelming, but here’s a little secret... You really only need to learn a few stitches and you can make anything! So strap in and let's learn to crochet 💪
Cardigang Hotline ☎️. These sessions are designed to help give you the skills you need to create a masterpiece. Whether you're just starting out, or you've got a specific question or problem (dropped a stitch, no stress!), we're here to get you out of a bind.
⚡️Let's get ready to rumble ⚡️
TEST YOUR TENSION
First thing's first. Before you start your project, make sure your tension is juuuust right 🥣 We do this by making a “tension swatch”. It's a bit like goldilocks, if the tension is too tight, your piece will be too small, and if it's too loose it may not hold its shape and might be too big.
If done correctly, your 10cm x 10cm swatch should be 6 rows high and 9 stitches wide when worked over rounds 5-9 with a 10mm hook.
💡 We know making a gauge swatch can seem like a bit of a drain, but it's really important because the difference of a few millimetres in a gauge swatch can lead to a finished piece this is quite different in size to what you intended.
SIZING
You can make your jumper in size 6-8, 10-12, 14-16, 18-20 or 22-24. Your pattern is read like this: 6-8 (10-12, 14-16, 18-20, 22-24). Make sure you're following the right instructions for your chosen size.
This jumper is a more fitted style, so we recommend sizing up if you'd prefer a looser fit.
MEASUREMENTS
Laying flat, your finished piece will measure approximately:
- 6-8: 43cm wide x 51cm high
- 10-12: 48cm wide x 55cm high
- 14-16: 53cm wide x 55cm high
- 18-20: 58cm wide x 59cm high
- 22-24: 63cm wide x 61cm high
LET'S WHIP UP A MASTERPIECE
This pattern uses two new techniques, back post double crochet and front post double crochet. Let's look at how we do these.
Back post double crochet
Front post, back post double crochet
If you need a refresher on any of the other techniques, check out our Learn to Crochet page.
Your pattern is written in U.S terms.
🌈 Your pattern comes with 6 colours. Colour 1 is your main colour and you’ll have more balls in this colour. The order of your other colours is up to you.
MAIN BODY
Our jumper is crocheted from the bottom up and in the round, until we reach the underarm. We'll then split our stitches to create arm holes and work the front and back panels in rows. Finally, we'll do the sleeves and the neckline which are both worked in the round.
Round 1 to 3
We start with the chain. Chain loosely so that the bottom rib of your jumper isn't too tight! Join your work into a circle with a slip stitch.
We're ready to complete the first round!
We'll create the bottom band of our jumper first.

ROUND 4 to 9
🧶 We'll create our pattern of stitches in rounds, changing colour each round as instructed.
This is what it will look like when you've completed one round of each pattern.

Repeat rounds 5 to 9 as instructed. This is what that will look like when done.

MARKING OUR ARM HOLES
Before we start crocheting the front and back, we're going to use our stitch markers to mark where we want our arm holes to sit.
After turning your work, count 2 (2, 2, 3, 3) stitches to the left of the stitch you just slipped your stitch into at the end of the previous round. Place your marker in this 2nd (2nd, 2nd, 3rd, 3rd) stitch.
Count another 33 (37, 41, 45, 49) stitches to the left and place your second marker in this 33rd (37th, 41st, 45th, 49th) stitch.
Now count another 5 (5, 5, 7, 7) stitches and place your third marker in this 5th (5th, 5th, 7th, 7th) stitch. Count another 33 (37, 41, 45, 49) stitches and place your fourth marker in this 33rd (37th, 41st, 45th, 49th) stitch.

BACK
Okay, time to work up the back in rows, and then we'll follow with the front.
Lay your work flat with the smallest spaces between markers at the sides (these are your underarm sections).
Using the next colour in your colour sequence, join your yarn in the stitch to the left of the right stitch marker.

Work up the front as your pattern instructs. Take note of the additional number of rows for larger sizes. Use the circles in your pattern to make off the rows as you go (this helps to keep track of your work). The circles with the dotted lines are for the larger sizes.
This is what your piece will look like when the back is completed

FRONT
Onto the front! This starts in the same way as the back, before we get to the point where we shape the neckline.
NECKLINE
We're going to shape the neckline now over 3 (4) rows. Take note of the instructions for your size specifically - each size is slightly different in it's construction.

SHOULDER SEAMS
Turn your jumper so the wrong sides are facing outward. Using your long tail, slip stitch along top of your shoulder, going through both panels to join.

NECK
Using your main colour (colour 1), join in centre back of neck, chain 3.

Working around the neckline, double crochet all the way around. At the end of the round you should have 42-50 stitches.
Slip stitch and chain three then follow the instructions for round s 2 and 3.
SLEEVES
We're nearly there! Time to do the sleeves 🕺
You’ll need two of these, so follow this part twice! Starting with your main colour, join your yarn in the middle of your underarm, and chain 1.

This is what your finished sleeve will look like.

FINISHED!
Time to rock your masterpiece 💪🔥🥳
Well done on finishing your top! Epic job. We know from experience that there's nothing quite like that first time someone asks you where you got your top from 😎
We'd LOVE to see how you go! Share your masterpiece with us by tagging @cardigang_knits on socials or by sending us an email at hello@cardigang.com.au
Until next time! 😘🧶💕
Morgan & Cat xx


