


A step-by-step guide to knitting the cosy-chic Holly Jumper
Ever gotten halfway through a project and thought “Hang on, am I even doing this right?” We have 🙋♀️
That’s why we’ve created these step-by-step guides to walk you through the knitting process.
Even if you've never knitted before, we'll take you from zero to knitting hero in no time 🦸♀️
When it comes to knitting, practice makes perfect
Before we get started on the pattern we suggest you spend a bit of time learning the basic stitches you’ll need to complete your masterpiece.
Subtle but with just the right amount of detail the Holly jumper's going to be your new favourite. Holly is a great project whether you've knitted one or two cosy masterpieces before or it's your first knitting adventure. If you're a total beginner you'll want to be confident with the knit stitch and its friend the purl stitch before we start. We put the knit and purl stitches together to make a rib stitch, a stockinette stitch and a seed stitch. You'll also want to get the hang of tying a slip knot and casting on - AKA getting the stitches onto your needle!
You can use the yarn that came in your kit to practice with. Once you've got these mastered you'll find the pattern a cinch!
Total beginner? 👩🏫
For a more comprehensive lesson on the basics of knitting visit our Learn How To Knit page.
Onto the Jumper!
⚡️What you'll need
Your kit comes with everything you'll need to make your masterpiece. In your kit you'll find;
- 10mm circular needles
- 15mm needles
- 6-7 balls of Cardigang Chunky Merino Wool
- A darning needle
- Made by me tag
You also want to have a pair of scissors handy.
📏 Sizing and measurements
You can make your Holly Jumper in 3 sizes.
| SIZE |
MEASUREMENTS (laying flat) |
| 1 / S / 6-8 | 61cm wide x 50cm high |
| 2 / M / 12-14 | 66cm wide x 52cm high |
| 3 / L / 14-16 | 71cm wide x 54cm high |
Your pattern is read like this; 1-2 (2-3). Make sure you're following the correct instructions for your size.
🥣 Test your tension
Before you start your project, make sure your tension (how tightly or loosely your knitting is) is juuuust right. We do this by knitting a “tension swatch”. It's a bit like goldilocks, if the tension is too tight, your piece will be too small, and if it's too loose it may not hold its shape and might be too big.
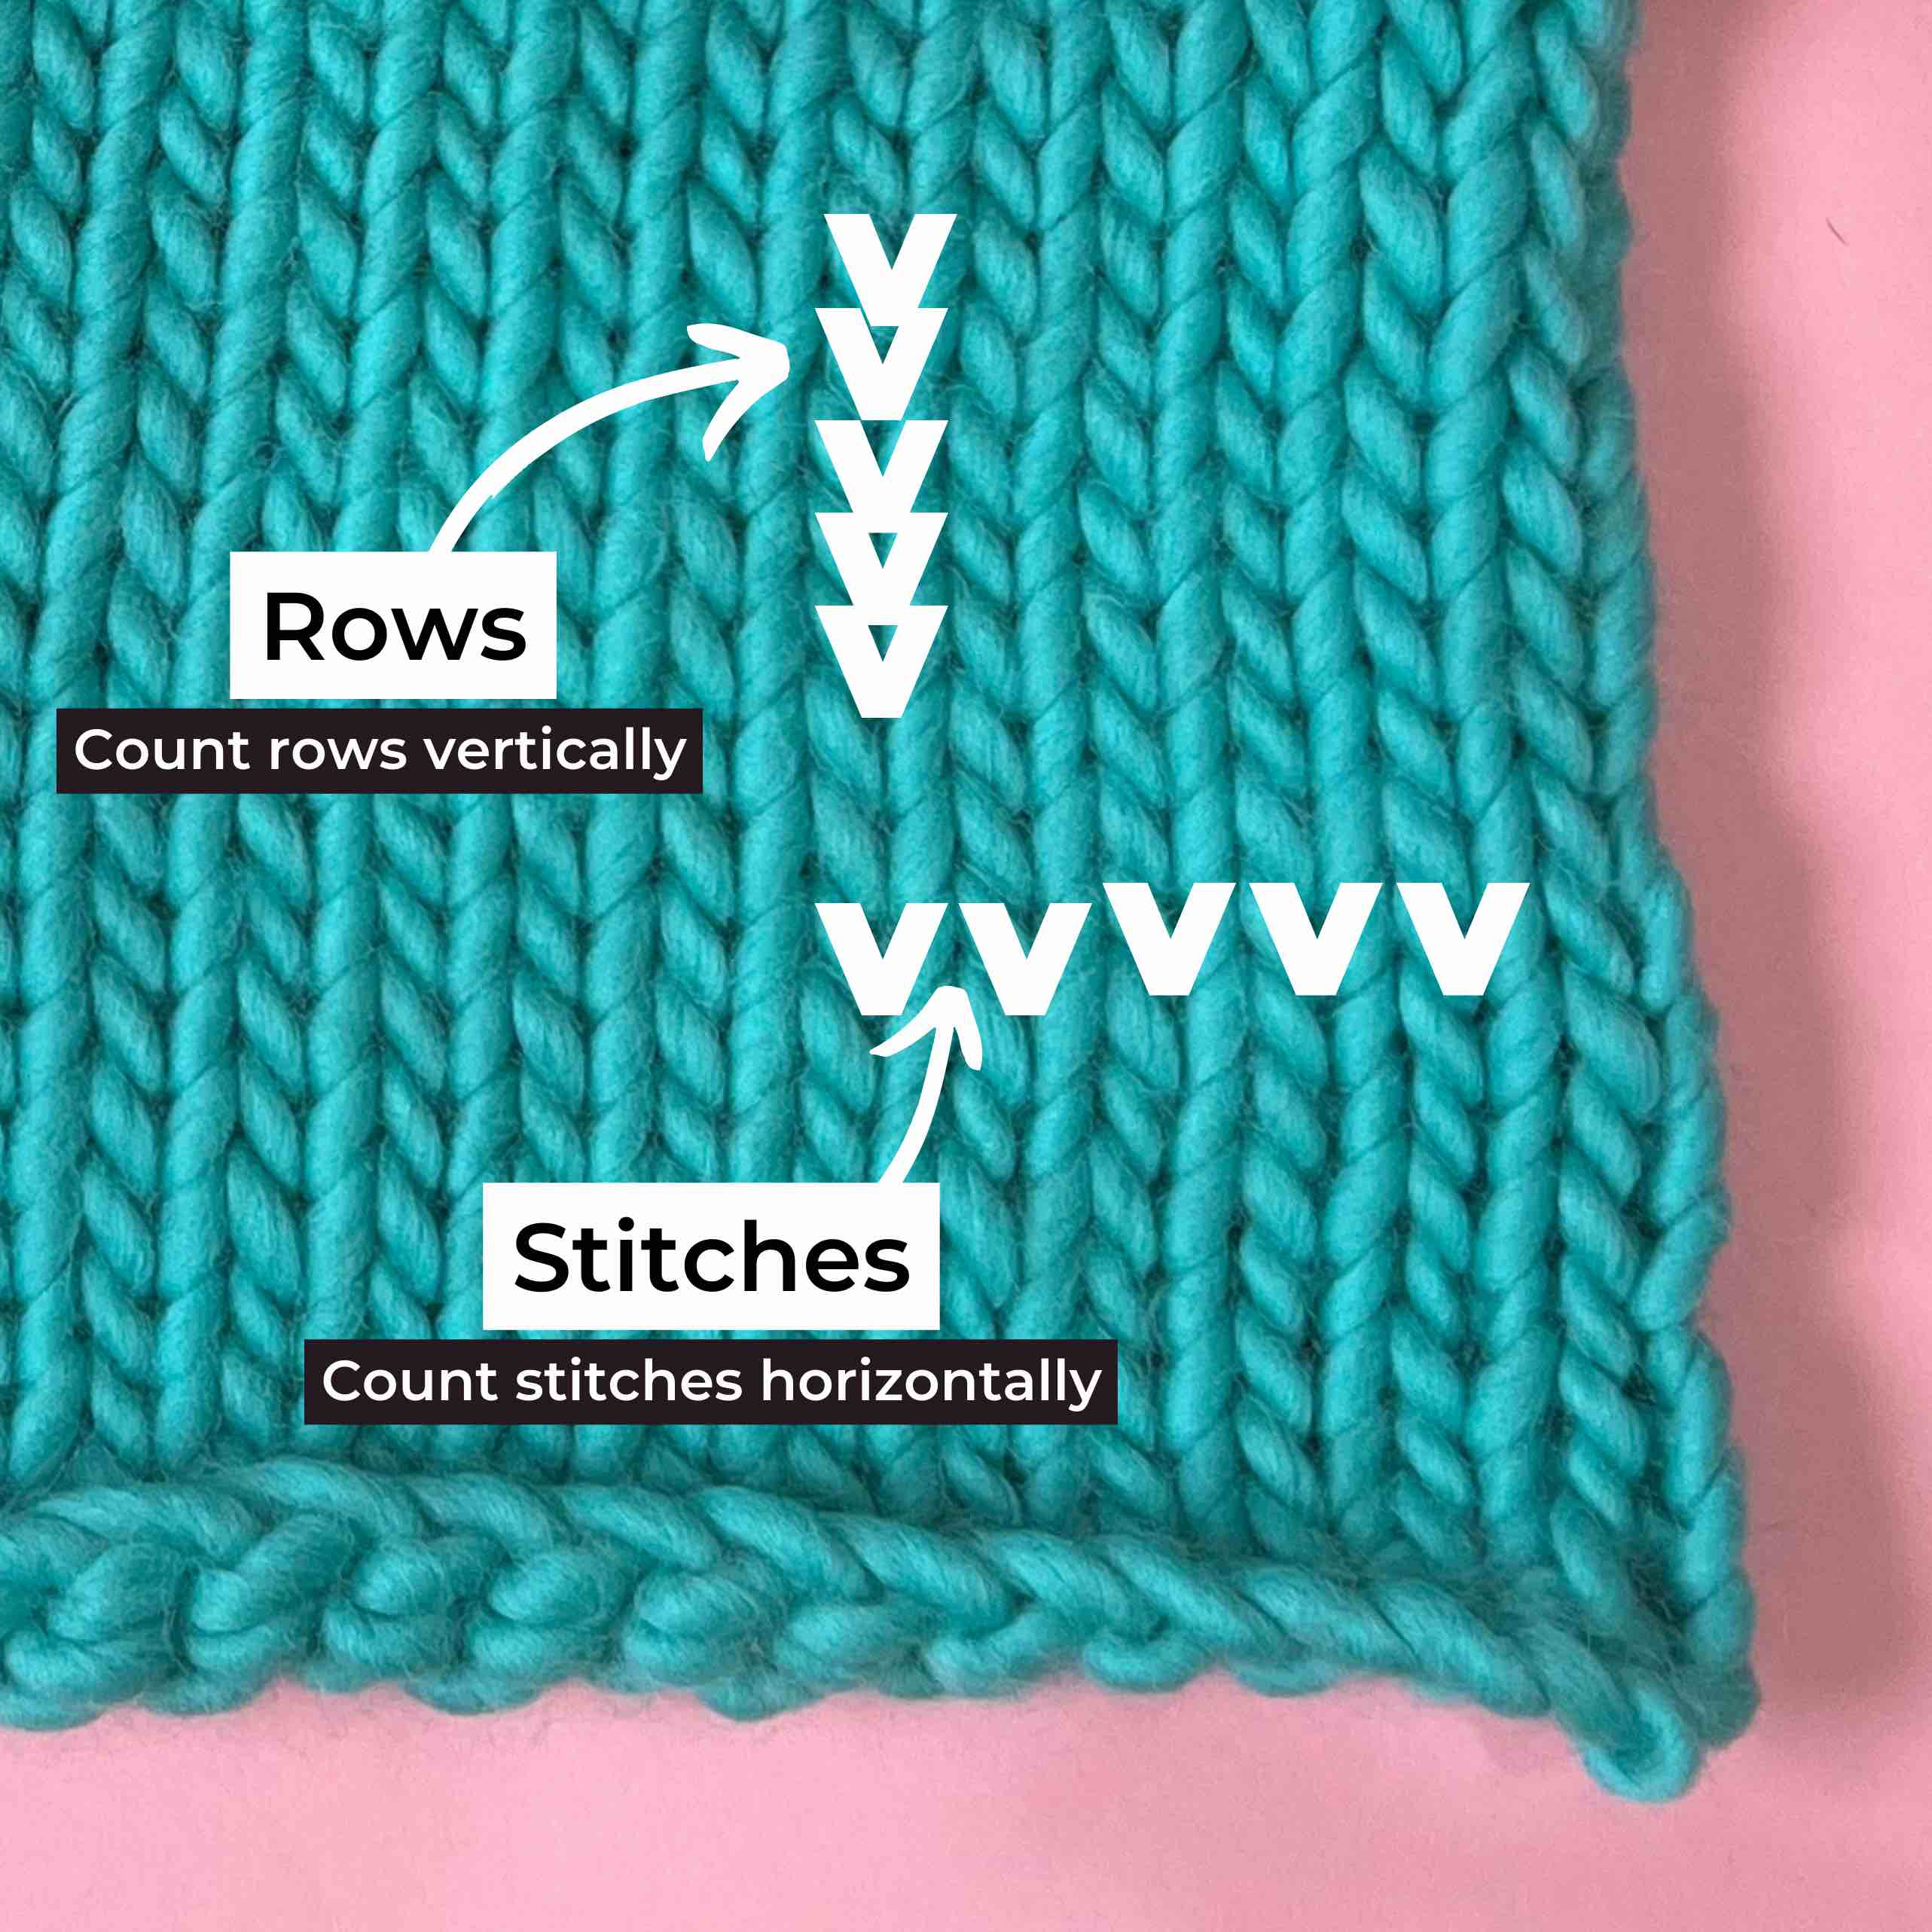
Gauge: If done correctly, your 10x10cm knitted swatch should be 7 stitches wide and 9-10 rows high when knitted in stockinette stitch on your 15mm needles.
To test this, jump on your needles - use the yarn and needles that came in your kit. Cast on around 12-14 stitches, then knit in stockinette stitch (knit all stitches in your first row, purl all stitches in the next - repeat) for around 12-14 rows. Then measure a 10x10cm square and count your stitches and rows within that space to make sure you're knitting at the correct tension.
If you've got more stitches or rows than the instructions say you should have, your knitting is a little too tight, and if you've got less your knitting is too loose. Adjust your tension by holding the yarn a little more tightly/loosely as you knit.
💡 We know knitting a tension swatch can seem like a bit of a drain, but it's really important because the difference of a few millimetres in your tension can lead to a finished piece this is quite different in size to what you intended.
🧶 Let's knit up a storm!
Time to get click-clacking and whip up your cosy jumper.
Remember learning a new skill can be a little challenging at first, and you’re bound to find yourself making some mistakes along the way. But as with learning anything, your brain and your hands slowly start to get the hang of it, muscle memory is created, and soon the thing you found tricky/daunting/scary is like second nature! 💪
BACK
We knit our masterpiece in pieces, starting with the back panel, then the front, and then the sleeves. Once we have all our pieces we’ll sew the jumper together and knit the ribbed neckline.
We start with the back panel, it’s the simplest piece of the knit and will give you confidence as you move on to other pieces. We knit from the bottom up, starting at the rib and going up to the shoulders.

Step 1:
Cast on the required number of stitches using your 10mm needles.
Hot tip: your piece will 'grow' as you knit so don't be alarmed if it looks like you're knitting a baby's jumper to start with!
Step 2:
We’ll work the allocated rows of 1x1 rib stitch. To create a rib we knit 1 stitch, then purl the next, then knit the next, then purl the next and repeat.
💭 Make sure you’re moving your yarn tail from the back to the front of your work between each stitch (bring the yarn in through the middle of the needles) to ensure the rib is executed correctly.
Step 3:
Next, we're going to change to our 15mm needles to knit up the rest of this piece.
We knit the body in alternating stripes of stockinette stitch and seed stitch.
Stockinette stitch is created when we knit all stitches in one row and then purl all stitches in the next row - we repeat this sequence for the number of rows specified in the pattern.
Seed stitch is made by alternating knit stitches and purl stitches within a row and between rows. It is called seed stitch because the stitches create little bumps that may look like seeds. Seed stitch is identical on both sides and lies flat.
💭 To switch to a different size needle we just hold the new needle (in this case the 15mm needle) in our right hand and the current needle with your work on it in your left hand. Then knit the stitches from your left needle onto the new needle in your right hand.
So for this step, you'll knit a specified number of rows in stockinette stitch.
Tick off the circles to help you keep track of your progress.
Step 4:
Next, you'll complete some rows in seed stitch. Like we did with the rib stitch, you need to move your yarn tail from the back/front of your work in between each stitch.
💭🧶 Starting a new ball: You'll need to start with a new ball when your first runs out. The best method for beginners is as follows. When you've got about 30cm of wool left on your current ball, you incorporate the tail from the new ball into your next stitch. You do this by starting your next stitch with your new tail and knitting on with that new ball, making sure the loose ends for both balls are on the wrong side/inside of your work. Then all you need to do is tie the two ends together in a knot once you finish the row.
Step 5-9:
Continue knitting in alternate bands of stockinette stitch and seed stitch as the pattern instructs.
Step 10:
Cast off the stitches for your back panel. When you have just one stitch left on your right needle, cut your yarn from the ball (leaving about 20cm) and thread it back through your last stitch to secure it 🔥 Nice work! The biggest piece of your jumper is done!
Did somebody say wine time?! 🍷
FRONT
Step 1-9:
Want some good news?! The front is identical to the back piece up until we reach the last 4 rows where we start to shape the neckline. So you'll knit this piece in exactly the same way as the back.
Step 10:
We're going to start the neckline now. To do this, we split the work into two shoulders and a space for the head hole. We're going to create some shape around the head hole by knitting some stitches together on our knit rows.
🎬 Watch How to knit your neckline
So let's knit up the first shoulder. We're going to knit the number of stitches the pattern specifies and then knit two together to create a decrease.
🎬 Watch How to knit two together
Step 11:
Turn your work and purl those same stitches again. The rest of the stitches will hang out on your needles until we've finished this first shoulder.
Step 12-14:
You'll continue knitting up the first shoulder as the pattern instructs over the next 2 rows.
Once you've done the 4 rows you'll cast off your stitches.
Step 15-19:
Let's knit up the second shoulder now 💪
We're going to mirror the shaping we did on the previous shoulder.
You'll want to reattach your yarn to the stitch closest to the end of your needle by tying a knot at the base of that first stitch. The little V's should be facing you because we're starting on the knit side of the work.
First, you'll cast off some stitches. This creates the space for our head hole.
Then knit up your second shoulder as instructed.
Once you've done the 4 rows, cast off your stitches. And that's the front of your jumper D.O.N.E! 🕺 Time for a happy dance!
SLEEVES
Step 1-7:
We knit our sleeves from the top down so you'll start with your 15mm needles and you'll work through those bands of alternating stitches until you reach your cuffs.
Remember you need 2 of these so follow the instructions twice! 😎✌️
Step 8:
We're going to decrease the number of stitches in this row in order to create a nice balloon shape for our sleeve before we knit the cuff.
Knit two stitches together along the row as instructed - note the different sizes will follow a slightly different sequence so just make sure you're following the correct size.
Step 9-12:
Next, we switch to using our 10mm needles to knit the cuff of our sleeves. We'll knit these in 1x1 rib stitch.
Hot tip: Cast off your stitches loosely so your hand can fit easily through the end of your sleeve!
SEWING TOGETHER
Grab your darning needle, we're going to sew our masterpiece together now.
📹 Watch How To Sew Your Knit Together
Step 1:
Lay your front and back pieces on a flat surface, the right sides facing you.
Step 2:
Sew the shoulder panels together using the invisible seam technique, leaving the hole for your head.
Step 3:
Time to attach the sleeves to the body. Make sure the middle of your sleeve is lined up with the shoulder seam. This will ensure the seam of your sleeve is right under your armpit, not halfway around your arm! Once you've made sure it's all lined up, sew the sleeves to the shoulders.
Step 4:
Fold your jumper in half so it looks like the shape of a T. With the wrong sides facing each other, we're going to sew it together from the cuff all the way up the arm to the armpit, then down the side seam to the bottom of your jumper. And then repeat this on the other side.
💭 We suggest trying to match the colour yarn you use to the jumper to keep it as invisible as possible. It's normal for the wool to get a bit shabby as you go, so we recommend using a few pieces and tying them together underneath as you go!
NECKLINE
Step 1-2:
Okay knitting QWEEN we're going to finish our gorgeous jumper with the neckline.
Using your 10mm needles you'll pick up an even number of stitches from around the neckline.
Mark the beginning of your loop with a stitch marker (or anything round!) and then knit 3 loops of 1x1 rib stitch.
📹 Watch How To Knit Your Neckline
Step 3:
Cast off your stitches. Now this part is critical... don't cast your stitches off too tightly or your cute little head won't fit through the head hold! We've been there and trust us, it's super frustrating!
FINISHING
The last thing we do for every piece is weave in the ends. That’s basically just tidying up the piece so all loose ends are trimmed down and tucked into the inside of your work. You use your darning need and weave those ends into the seams so they are nicely hidden away.
BLOCKING (OPTIONAL)
The final step in finishing a knitted piece is to block it. This step is optional and not all beginner knitters will block their work (we certainly didn't 🤣) but it can improve the overall shape and finish of your piece.
Blocking your knitting is a process where you wet your piece to set the finished size and even out the stitches.
You can choose to block your work before you seam it together, or after. If you block before seaming together you might get a better result with your seaming because the stitches will be more lined up.
Step 1
Soak your knit in cool water. You only need to let your piece sit in the water for a few minutes and make sure the full piece is completely wet.
Step 2
Remove your knit from the water and dry it off by rolling it in a towel. You want to get us much of the moisture out of the knit as possible at this point but be gentle! You don't want to stretch the knit.
Step 3
Transfer your damp knit to a flat surface to block it on. If you've got a blocking mat - great! otherwise a towel will work. The surface needs to be somewhere where your knit can lie flat and can stay there until it fully dries so that the shape sets properly. Make sure it's not a surface that can be easily damaged by having something wet sitting on it!
Step 4
Arrange your piece so the right side is facing up and the shape is as you'd like it. If you've got a measuring tape you can measure and adjust the piece so it's the correct size.
Step 5
Allow the knit to air dry - this can take a few days. You can also use a hair dryer to speed up the process, just use a light heat and don't concentrate the air in one spot.
D.O.N.E! You've finished your jumper, well done! Epic work 🤩 If this was your first-ever knitting project or one of many, we hope you had a blast click-clacking and making your masterpiece 💥❤️
Looking for something a little more personal?
Sign up for a one-on-one knitting or crochet session with the Cardigang Hotline ☎️. These sessions are designed to help give you the skills you need to create a masterpiece. Whether you're just starting out, or you've got a specific question or problem (dropped a stitch, no stress!), we're here to get you out of a bind.