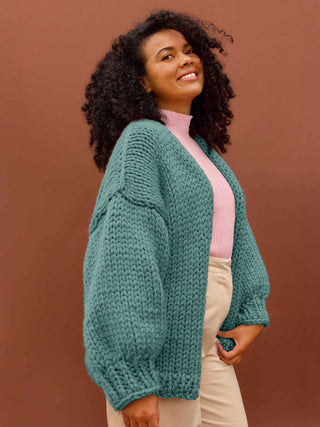
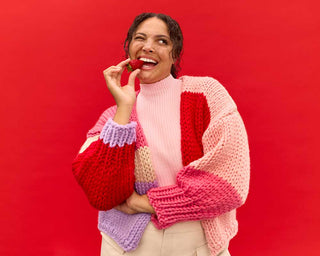
A step by step guide to knitting the classic beauty, Jeanette.
Ever gotten halfway through a project and thought “Hang on, am I even doing this right?” We have 🙋♀️
That’s why we’ve created these step-by-step guides to walk you through the knitting process.
Even if you've never knitted before, we'll take you from zero to knitting hero in no time 🦸♀️
PRACTICE MAKES PERFECT
Before we get started on the pattern we suggest you spend a bit of time learning the basic stitches you’ll need to complete your masterpiece. The Jeanette Jumper is made using a combination of knit and purl stitches. We put these together to make a 1x1 rib stitch and a stockinette stitch. You'll want to be confident with the knit and purl stitches before you start 🧶 You'll also want to get a hang of tying a slip knot and casting on your stitches which is the first step in any knitting project.
📹 Watch How To Tie A Slip Knot
📹 Watch How To Cast On
📹 Watch How To Knit Stitch
📹 Watch How To Purl Stitch
You can use the yarn that came in your kit to practice with. Once you've got these mastered you'll find the pattern a cinch!
👩🏫 For a more comprehensive lesson on the basics of knitting visit our Learn How To Knit page. Or jump to our YouTube page and do some exploring.
Cardigang Hotline ☎️. These sessions are designed to help give you the skills you need to create a masterpiece. Whether you're just starting out, or you've got a specific question or problem (dropped a stitch, no stress!), we're here to get you out of a bind.
TEST YOUR TENSION
First thing's first. Before you start your project, make sure your tension (how tightly or loosely your knitting is) is juuuust right 🥣 We do this by knitting a “tension swatch”. It's a bit like goldilocks, if the tension is too tight, your piece will be too small, and if it's too loose it may not hold its shape and might be too big.
If done correctly, your 10x10cm knitted swatch should be 7 stitches wide and 9 rows high.
To test this, jump on your needles, cast on around 12 stitches, then knit in stockinette stitch (row 1 knit, row 2 purl) for around 10 rows. Then measure a 10x10cm square and count your stitches and rows within that space to make sure you're knitting at the correct tension.
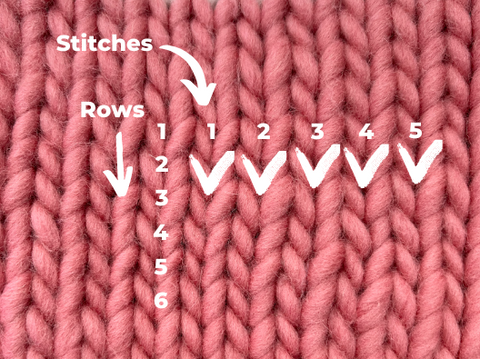
💡 We know knitting a tension swatch can seem like a bit of a drain, but it's really important because the difference of a few millimetres in your tension can lead to a finished piece this is quite different in size to what you intended.
WHAT YOU’LL NEED
Your kit comes with everything you need to knit your masterpiece.
- 12mm circular needles
- 15mm circular needles
- 6-7 balls of Chunky Merino yarn
- Darning needle
SIZING
You can knit the Jeanette in 5 sizes from size 6 to 24. Your pattern is read like this 6-8 (10-12, 14-16, 18-20, 22-24).
OKAY, LET’S KNIT UP A STORM!

BODY
We start knitting the body "in the round" and from the bottom up. That means we'll start with a rib stitch before we move into a knit stitch and we're knitting in loops.
📹 Watch How To Knit In The Round
Step 1:
Cast on the required number of stitches using your 12mm circular needles.
Step 2:
Once you've cast on the right number of stitches you will join your stitches in a loop and then move on to the rib. Knit the rib following the instructions in your pattern. To create a rib we knit 1 stitch, then purl the next. Make sure you’re moving your yarn tail from the back to the front of our stitch to ensure the stitch is executed correctly.
📹 Watch How To Do A Rib Stitch
💭 Make sure you use a stitch marker to keep track of the number of rows/loops you’ve knitted. A stitch marker can be anything round; a ring, hair tie or a spare piece of yarn.
Step 3:
Next, we move on to using our 15mm circular needles and into knit stitch.
To switch to a different size needle we hold the new needle (in this case the 15mm circular needle) in our right hand and knit onto the stitch on your 12mm needle in your left hand. Simple!
Knit the allocated number of knit rows. Remember to tick off a circle for each row/loop you've knitted so you can keep track! The dashed circles are for bigger sizes.
Step 4-5:
We're going to split the work now, so we knit up the back and the front of the body separately. We knit up the back first.
Because we're no longer knitting in the round, we have a 'front' and 'back' of the work. This means instead of knitting every row, we need to knit one row and then purl the next - this stitch is called stockinette.
Knit one row. Then flip your work and purl the next row.
The other stitches will just hang out on your needle until we're ready to come back to them. Knit your stitches.
Step 6:
Continue knitting in stockinette stitch.
Flip your work over and we're going to work these stitches again.
Step 7:
Cast off the stitches you've been working on. That's the back part of your body done! Well done 💪
📹 Watch How To Cast Off
Step 8:
Time to work up the front of your body.
First, attach your yarn to the first of the stitches you've got left on your needle. You'll want to pick the side that means you'll start with a knit stitch - so the little V's should be on the side facing you.
Knit this row.
Step 9:
Flip your work over and purl stitches.
Step 10:
We're going to complete the allocated number of rows of stockinette stitch.
Step 11:
Okay, time to start shaping the neckline! We do this over 4 rows. We'll knit up one shoulder first and cast off. We'll then reattach our yarn, create a space for the head-hole by casting off some stitches, and then knit up the second shoulder.
So, knit the allocated number of stitches and then knit two stitches together. To knit two together you slip your right needle in behind two stitches instead of one, and then knit as you would.
📹 Watch How To Knit Your Neckline
📹 Watch How To Knit Two Stitches Together
Step 12:
Flip your work and we will purl those same stitches. Leave the rest of your stitches on your needle, we'll come back to them later.
Step 13-14:
We repeat the same sequence from the last 2 rows to reduce the next knit row and then purl a row.
Step 15:
Cast off those stitches. That's shoulder 1 done!
Step 16:
Rejoin your yarn by tying a knot to the base of the stitch closest to the tip of your needle. We're going to cast off some stitches to create that gap for the head-hole.
Cast off the allocated number of stitches. You'll have one stitch left on your right needle. Just slip that one back onto your left needle and we will knit two stitches together before we knit the rest of the stitches.
Step 17-20:
We continue in the same way we did for the first shoulder.
Cast off the stitches for shoulder 2 and that's the body done 🚀
SEW YOUR SHOULDERS
Before we move into the sleeves we're going to sew the shoulders of your body together. Grab your darning needle to sew the shoulder seams together using the invisible seam technique - demonstrated in the video below.
📹 Watch How To Sew Your Knit Together
SLEEVES
Onto the sleeves. You'll do two of these 😎🧶
We start at the top of the sleeve and knit down to the cuff.
Step 1:
Using your 15mm needles pick up the allocated number of stitches from around the arm hole. The below video demonstrates this technique on a neckline but the process for the arm holes is the same.
📹 Watch How To Pick Up Stitches
Step 2:
We're knitting in the round again which means we knit every row. This should be a cinch by now! 💪
💭 Remember to use a stitch marker to keep track of your rows.
Step 3:
To get the shape in our sleeve, we're going to decrease some stitches before we knit the cuff. You'll knit two stitches together all the way along the row.
Step 4:
Once that’s done you'll swap to your 12mm needles to start your rib stitch for 8 rows.
Step 5:
Cast off your stitches. When you cast off make sure it’s not too tight otherwise you’ll have a really tight wrist hole!
Repeat for your second sleeve.
NECKLINE
We're SO CLOSE! I can see the finish line 🎢 🙌
We knit the neck in the round with our 12mm needles.
So first things first. We pick up the allocated number of stitches in equal distance from around the neck hole. Once you’ve got all your stitches on your needles you join the loop together and start the rib stitch.
Knit in the round until you’ve completed 5 loops then cast off.
💭 Remember to use a stitch marker to keep track of your rows.
🚨 Now this part is critical! Cast of extra loosely!! You need a loose cast off in order to be able to fit your head through the hole. Rib stitch has a stretch to it, but if you cast off too tightly you'll have a hole that's too small for your head to fit through. Been there, done that and DON'T recommend 😝
FINISHED!
Time to rock your masterpiece 💪🔥🥳
Well done on finishing your knit! Epic job. We know from experience that there's nothing quite like that first time someone asks you where you got your knit from 😎
We'd LOVE to see how you go! Share your masterpiece with us by tagging @cardigang_knits on socials or by sending us an email at hello@cardigang.com.au
Until next time! 😘🧶💕
Morgan & Cat xx


