


A step by step guide to knitting the cozy Kane.
Ever gotten half way through a project and thought “Hang on, am I even doing this right?”
We have 🙋♀️
That’s why we’ve created these step by step overviews to help guide you through the knitting process.
At each stage we’ll show you how to knit each section of your scarf and what techniques/stitches you'll need to do. Voilà! We’ve also included videos below of the main techniques and stitches we cover in this pattern. So head on down to the bottom of the page if you just need a quick visual reference.
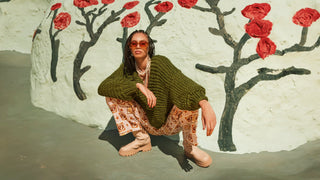
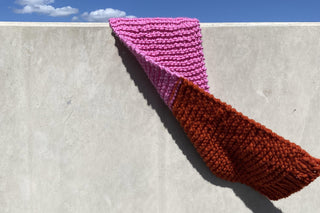
THE KANE SCARF
Kane's the outdoorsy type, soft and super cozy and loves to wrap himself around a stylish gal or guy.
He’s got some big knit energy, is perfect for the novice knitter and has just enough detail that no one will believe you made it yourself. Made from glorious merino wool, Kane is sure to brighten up any winter wardrobe.
YOUR CARDIGANG PATTERN
Learning to knit can feel like learning code. We've stripped away the complicated jargon and tried to keep things really simple. If your head is still spinning a little, here's a handy video to help you better understand the layout of your pattern.
TEST YOUR TENSION
Before we dive in let's check that the tension is in line with what we need. We knit a swatch to make sure the tension is juuuust right. It's a bit like goldilocks, if the tension is too tight, your scarf will too small, and if it's too loose it may not hold it's shape and might be too loose.
If done correctly, your 10x10cm swatch should knit 7 stitches and 9 rows.
THE BASICS
Before we get started, learn all the basics with our how to video. This one covers Casting on, 1x1 Rib stitch, Knit stitch, Purl stitch and Casting off. Once you've got these mastered you'll find this pattern is a cinch!
ONTO YOUR SCARF!
STEP ONE: CASTING ON
Okay guys, so we need to get our stitches onto our 15mm needles. Do do this we use a method call "casting on". We start with a slip stich and then knit the stitches onto your left needle.
There are plenty of ways to do this, so we suggest jumping onto YouTube, having a poke around and watching a few different methods. Then pick the one that feels the most natural and off you go! We've also included a video below with the method we've found to be the easiest for beginners.
STEP TWO: RIB STITCH
Time to dive into the rib stitch. What is a rib stitch? Glad you asked!
1x1 Rib Stitch is a textured pattern usually used on the cuffs and necks of jumpers. It’s made by alternating knit and purl stitches in the same row, then knitting the same stitch in the next row. Eg. knitting your knits and purling your purls. When doing your rib stitch it’s important to make sure your yarn is on the correct side of your needles (at the back for knit stitches and at the front for purl stitches.)
💡 Slip your first stitch on your left need onto your right needle without knitting it. If you do this on every row it will stop your scarf from curling up at the sides.
Normally we'd start a rib stitch by knitting one and then purling one, but because we're slipping our first stitch it's going to look a little different.
Slip your first stitch onto your needle, purl your second stitch, knit your third. Then continue to purl one, knit one until the end of your row. And repeat the number of rows as outlined in your pattern.
STEP THREE AND FOUR: GARTER STITCH
Now we're going to do a garter stitch, which is easy peasy!
Garter Stitch is a basic stitch that most knitting patterns often don't explain! You create a garter stitch by knitting every row. And the best part? It’s reversible, as there’s really no right or wrong side.
Slipping our first stitch, we're going to knit every row until we have about 20cm left of wool.
STEP FIVE: CHANGING BALLS
It's time to start working with our second ball of the same colour.
If you’re just starting a new ball of the same colour then the best method for beginners is to start your next stitch with your new ball, making sure the loose ends for both balls are on the same side of your scarf. Then all you need to do is tie the two ends together in a knot and weave in the loose ends using your darning needle.
💡 If you're changing a colour you should do this at the start or end of a row. The method is the same but you want to ensure you have clean separation of colours in your knit.
STEP SIX: CONTINUE GARTER STITCH
Now that we have our second ball attached we'll continue to do our garter stitch until we have about 20cm left.
💡 Try and stop at the end of the row to get a clean separation for your next colour, if you have extra wool left over that’s ok!
STEP SEVEN: CHANGING COLOURS
Now that you're a pro at changing balls, it's time to change to our third ball in our contrast colour.
Once you're knitting with your new ball, continue with the garter stitch for the allocated number of rows in your pattern.
STEP EIGHT: RIB STITCH
To make sure the ends of our scarf are even, it's time to finish off with a rib stitch.
Slip your first stitch onto your needle, purl your second stitch, knit your third. Then continue to purl one, knit one until the end of your row. And repeat the number of rows as outlined in your pattern.
STEP NINE: CAST THAT BABY OFF
HOORAY! YOU'VE MADE IT!
It's time to cast off your stitches and weave in the loose ends. You. Are. Done.
VIDEOS FOR A BIT OF EXTRA HELP!
Don't worry if your head is spinning and your fingers are unco, YouTube was our best friend when we taught ourselves how to knit.
Here are some videos which can help but feel free to go searching for your own. There are a number of techniques people use for a lot of the common stitches so there's no one right way.
Find what works for you! If you get stuck, reach out to us and we'll give you a hand! 😎
Testing your gauge
Casting On
Knit Stitch
Garter Stitch
1x1 Rib Stitch
Casting Off
Changing colours
Weaving in the ends