


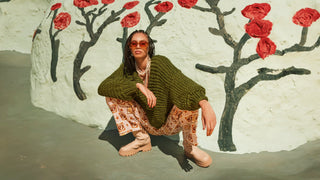


A step-by-step guide to knitting the gorgeous, Olivia Cardigan.
Ever gotten halfway through a project and thought “Hang on, am I even doing this right?” We have 🙋♀️
That’s why we’ve created these step-by-step guides to walk you through the knitting process.
Even if you've never knitted before, we'll take you from zero to knitting hero in no time 🦸♀️
PRACTICE MAKES PERFECT
Before we get started on the pattern we suggest you spend a bit of time learning the basic stitches you’ll need to complete your masterpiece. The Olivia Cardigan is made using a combination of knit and purl stitches. We put these together to make a 1x1 rib stitch and a stockinette stitch. You'll want to be confident with the knit and purl stitches before you start 🧶 You'll also want to get a hang of tying a slip knot and casting on your stitches which is the first step in any knitting project.
📹 Watch How To Tie A Slip Knot
📹 Watch How To Cast On
📹 Watch How To Knit Stitch
📹 Watch How To Purl Stitch
You can use the yarn that came in your kit to practice with. Once you've got these mastered you'll find the pattern a cinch!
👩🏫 For a more comprehensive lesson on the basics of knitting visit our Learn How To Knit page. Or jump to our YouTube page and do some exploring.
Cardigang Hotline ☎️. These sessions are designed to help give you the skills you need to create a masterpiece. Whether you're just starting out, or you've got a specific question or problem (dropped a stitch, no stress!), we're here to get you out of a bind.
TEST YOUR TENSION
First thing's first. Before you start your project, make sure your tension (how tightly or loosely your knitting is) is juuuust right 🥣 We do this by knitting a “tension swatch”. It's a bit like goldilocks, if the tension is too tight, your piece will be too small, and if it's too loose it may not hold its shape and might be too big.
If done correctly, your 10x10cm knitted swatch should be 7 stitches wide and 9 rows high.
To test this, jump on your needles, cast on around 12 stitches, then knit in stockinette stitch (row 1 knit, row 2 purl) for around 10 rows. Then measure a 10x10cm square and count your stitches and rows within that space to make sure you're knitting at the correct tension.
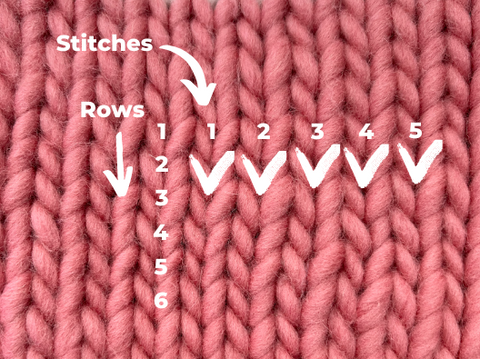
💡 We know knitting a tension swatch can seem like a bit of a drain, but it's really important because the difference of a few millimetres in your tension can lead to a finished piece this is quite different in size to what you intended.
SIZING
You can knit the Olivia in size S-M (AU6-10) or M-L (AU12-16). Your pattern is read like this: S-M (M-L).
MEASUREMENTS
Lying flat your piece will measure:
Size S-M: 60cm wide x 49cm high
Size M-L: 69cm wide x 58cm high
💡 Your kit comes with enough yarn to knit both sizes so there is still time to change your mind about size!
WHAT YOU’LL NEED
Your kit comes with everything you need to knit your masterpiece. To knit Olivia you’ll use;
-
10mm circular needles - we use these for the rib at the bottom and on the cuffs
-
15mm straight needles - these are to knit the body of your jumper
-
1 x ball of colour 1, 3, 4, 5
-
2 x balls of colour 2
-
Darning needle - this is used to sew your masterpiece together and weave in loose ends
USING YOUR PATTERN
One of the things we found the hardest when we were learning to knit was keeping track of our rows. Before we were able to easily identify a row of stitches we used a pen and paper to keep track. That's why we've included handy circles in our patterns - you can tick them off as you go. The dashed circles are for the larger sizes.
OKAY, LET’S KNIT UP A STORM!


BACK
We start with the back panel, it’s the simplest piece of the knit and will give you confidence as you move on to other pieces. We knit from the bottom up, starting at the rib and going up to the shoulders.
Step 1:
Cast on the required number of stitches using your 10mm circular needles and colour 1 yarn.
Step 2:
Once you've cast on the right number of stitches you move on to the rib. We knit the rib following the instructions in your pattern. To create a rib we knit 1 stitch, then purl the next. Make sure you’re moving your yarn tail from the back to the front of our stitch to ensure the stitch is executed correctly.
📹 Watch How To Do A Rib Stitch
Step 3:
Next, we move onto using our 15mm straight needles and into stockinette stitch.
To switch to a different size needle we just hold the new needle (in this case the 15mm straight needle) in our right hand and knit onto the stitch on your 10mm needle in your left hand. Simple!
We knit the required number of rows of stockinette stitch.
Step 4:
Next we're going to change our yarn colour to colour 2. We always change colours at the end of a row. Watch the video below to see how.
📹 Watch How To Change Colours
We’ll work the allocated rows of stockinette stitch in colour 2.
Step 5:
Time to change colours again, this time to colour 3. We do this in exactly the same way as last time. Finish knitting the allocated rows of stockinette stitch.
Step 6:
Time to cast off our stitches to finish the back piece. Well done!
📹 Watch How To Cast Off
FRONT PANELS
We're going to knit 2 front panels. Now, Olivia is an asymmetric style so the two front panels knit up slightly differently in terms of their colours but the process of knitting is the same as it was for the back panel.
Knit, knit, knit, knit...
SLEEVES
Onto the sleeves. You'll do two of theses too 😎🧶
We start at the top of the sleeve and knit down to the rib.
Step 1:
Using your 15mm straight needles and colour 1, cast on the correct number of stitches.
Step 2-3:
We're going to knit in stockinette stitch for the allocated number of rows. This should be a cinch by now! 💪
Step 4:
To get the shape in our sleeve, we're going to decrease some stitches before we knit the cuff. You'll knit two stitches together following the sequence in your pattern (it's slightly different depending on the size you're knitting). At the end of the row you should have 18 stitches left on your needle.
📹 Watch How To Knit Two Stitches Together
Step 5:
Once that’s done you'll swap to your 10mm needles to start your rib stitch for the allocated number of rows.
Step 6:
Cast off your stitches. When you cast off make sure it’s not too tight otherwise you’ll have a really tight wrist hole!
SEWING IT TOGETHER
We're SO CLOSE! I can see the finish line 🎢🙌
Now it’s time to get to work with the darning needle to sew your masterpiece together. We lay our pieces flat and sew them together one by one.
📹 Watch How To Sew Your Knit Together
Step 1:
Lay your front and back pieces on a flat surface, the right sides facing you.
Step 2:
Sew the shoulder panels together using the invisible seam technique, and leaving the hole in the middle for the open front of the cardi.
Step 3:
Time to attach the sleeves to the body. Make sure the middle of your sleeve is lined up with the shoulder seam. This will ensure the seam of your sleeve is right under your armpit, not half way around your arm! Once you've made sure it's all lined up, sew the sleeves to the shoulders.
Step 4:
Fold your cardi in half long ways with the wrong sides facing each other, we're going to sew it together using a Mattress Stitch, from the arm cuff all the way up the arm to the arm pit, then down the side seam to the bottom of your jumper. And then repeat this on the other side.
💭 We suggest trying to match the colour yarn you use to the jumper to keep it as invisible as possible. It's normal for the wool to get a bit shabby as you go, so we recommend using a few pieces and tying them together underneath as you go!
FINISHING
The last thing we do for every piece is weave in the ends. That’s basically just tidying up the piece so all loose ends are trimmed down and tucked in.
Time to rock your masterpiece 💪🔥🥳
Well done on finishing your knit! Epic job. We know from experience that there's nothing quite like that first time someone asks you where you got your knit from 😎
We'd LOVE to see how you go! Share your masterpiece with us by tagging @cardigang_knits on socials or by sending us an email at hello@cardigang.com.au
Until next time! 😘🧶💕
Morgan & Cat xx