


A step-by-step guide to crocheting the Poppy Bag.
Ever gotten halfway through a project and thought “Hang on, am I even doing this right?” We have 🙋♀️
That’s why we’ve created these step-by-step guides to walk you through the process.
Don’t let the fancy French name put you off. Even if it’s your first foray into crochet, everything’s going to be ok with our step-by-step tutorials.
When you first look at a crochet pattern it can be pretty overwhelming, but here’s a little secret... You really only need to learn a few stitches and you can make anything! So strap in and let's learn to crochet 💪
TOTAL BEGINNER? Start here first!
If you're a total beginner to crochet, we suggest you jump into our guide on learning the basics before you start your project.
TEST YOUR TENSION
First thing's first. Before you start your project, make sure your tension is juuuust right 🥣 We do this by making a “tension swatch”. It's a bit like goldilocks, if the tension is too tight, your piece will be too small, and if it's too loose it may not hold its shape and might be too big.
If done correctly, your granny squares should measure 13cm x 13cm when made using your chunky cotton and 6.5mm hook.
LET'S WHIP UP A MASTERPIECE
Your pattern is written in U.S terms.
Our bag is made up of granny squares which we sew together and then add straps.
GRANNY SQUARES
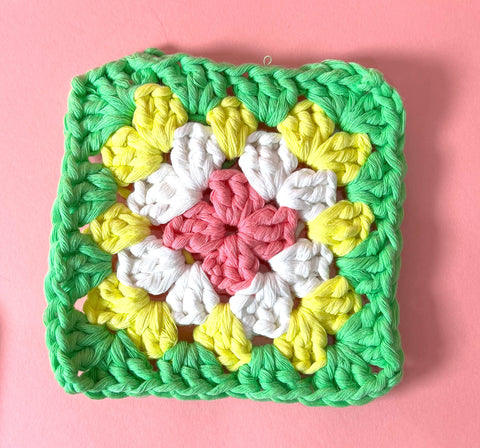
🌈 Identify your main colour before you start - you’ll have 4 balls of your main colour and 2 balls of each of the other 3 colours. The other colours can be rotated so you have a nice mix of colours in your granny squares. Just make sure the last round of every granny square is in your main colour, and avoid using your main colour in any other part of your squares.
This is what your finished square will look like.
And here is a video that shows you how to make it!
JOINING YOUR SQUARES
SQUARE LAYOUTS
We'll use our main colour to join our squares together. We’re using the slip stitch on the front side method and we'll join the horizontal seams first.
Use the layout below to arrange your squares. For the front and back you’ll need 2x2 squares and for the side and bottom, you’ll have the remaining squares in a single row.

JOINING YOUR 2x2 SQUARES

JOINING THE BOTTOM AND SHORT SIDES
JOINING IT ALL TOGETHER
Time to start joining the back section to the side panels. To do this we line up our panels and start to seam along the edges. Following the chart, you'll match up the seams (A-A, B-B, C-C etc).


Repeat for the other side.


And that's the body of your bag complete! 🚀
STRAPS
We’re going to create both straps in one go by crocheting around the top of our bag and creating a chain for each of our straps.
Follow the instructions in your pattern to create the straps. Photos are on their way!
FINISHED!
Time to rock your masterpiece 💪🔥🥳
Well done on finishing your top! Epic job. We know from experience that there's nothing quite like that first time someone asks you where you got your top from 😎
We'd LOVE to see how you go! Share your masterpiece with us by tagging @cardigang_knits on socials or by sending us an email at hello@cardigang.com.au
Until next time! 😘🧶💕
Morgan & Cat xx