A step by step guide to knitting the stunning Amy Cardigan.
Ever gotten half way through a project and thought “Hang on, am I even doing this right?”
We have 🙋♀️
That’s why we’ve created these step by step overviews to help guide you through the knitting process.
At each stage we’ll show you how each section your cardi should look, and at the end, how to sew it all together. Voilà! We’ve also included videos below covering the main techniques and stitches. So head on down to the bottom of the page if you just need a quick visual reference.
THE AMY CARDIGAN
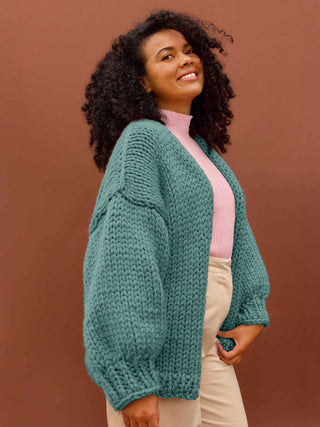
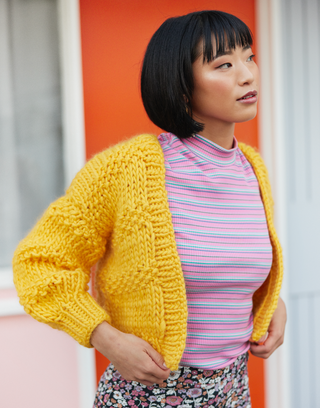
Amy's sure to be a wardrobe essential. She's an understated style but don't let that fool you, she's sure to turn heads. She's a gorgeous cropped style with a drop shoulder and she rocks bands of alternating stitches.
YOUR CARDIGANG PATTERN
Learning to knit can feel like learning code. We've stripped away the complicated jargon and tried to keep things really simple. If your head is still spinning a little, here's a handy video to help you better understand the layout of your pattern.
TEST YOUR TENSION
Before we dive in let's check that the tension is in line with what we need. We knit a swatch to make sure the tension is juuuust right. It's a bit like goldilocks, if the tension is too tight, your jumper will be too small, and if it's too loose it may not hold it's shape and might be too big.
If done correctly, your 10x10cm swatch should knit 7 stitches and 9 rows.
THE BASICS
Before we get started, learn all the basics with our how to video. This one covers Casting on, 1x1 Rib stitch, Knit stitch, Purl stitch and Casting off. Once you've got these mastered you'll find this pattern is a cinch!
ONTO THE CARDI!
You can knit the Amy in S, M or L. Each piece of the cardi is knitted flat, at the end we'll stitch each panel together to make your cozy masterpiece. Your pattern is read like this: S (M, L).
BACK
Okay guys, so we start with the back panel, it’s the simplest piece of the knit and will give you the confidence as you move onto other pieces.
We knit from the bottom up, stating at the rib and going up to the shoulders.
First, we cast the required number of stitches using your 10mm circular needles. We recommend using the two needle technique. Two needle knit cast on uses your two needles (surprise!), starting with a slip knot on your left needle, each stitch is knitted to form a new loop and this loop is then added to your left needle. You repeat until you’ve made the desired number of stitches.
💡 Casting on, like many things in knitting, can be done in a number of ways - our suggestion is a simple technique but you can pick any that’s right for you.
Once you've cast on the right number of stitches you move on to the rib. We knit the rib following the instructions in your pattern.
1x1 Rib Stitch is a textured pattern usually used on the cuffs and necks of jumpers. It’s made by alternating knit and purl stitches in the same row, then knitting the same stitch in the next row. When doing your Rib Stitch it’s important to make sure your yarn is on the correct side of your needles (at the back for knit stitches and at the front for purl stitches.)
Once we've finished the allocated amount of rows, we switch to the 15mm straight needles.
💡 To switch to a different size needle we just hold the new needle in our right hand and knit onto it.
Once all stitches are on your right needle you turn your work over and continue to knit with the second 15mm needle.
You'll work the allocated rows of stockinette stitch.
Stockinette Stitch (or stocking stitch) is a basic stitch that most knitting patterns often don't explain! You create stockinette stitch by knitting one row and purling the next. This means all of your knit stitches (the little Vs) will be on the right side of your jumper.
Simple right?! 😎
Now, Amy rocks bands of stockinette and seed stitch. Seed stitch is a little more special than your average stitch - but it's not hard!
Seed Stitch is a common, easy stitch pattern in knitting. It is made by alternating knit stitches and purl stitches within a row and between rows. It is called seed stitch because the stitches create little bumps that may look like seeds. Seed stitch is identical on both sides and lies flat.
Continue alternating the bands of stockinette and seed stitch until you've completed the last row of the back panel. Then it's time to cast off your stitches.
To cast off, knit two stitches then slip the first stitch on your right needle back over the second stitch and off the needle. You’ll have one stitch left on your right needle. Knit another stitch so you’ve got two stitches on your right needle and then slip the first stitch off. Continue to the end of the row. When you’ve got the last stitch on your right needle, cut the yarn and thread this through the final stitch to secure.
FRONT
Now onto the front panel. We are going to knit two front panels, your left and right. They are identical so no need to worry which is which.
The front panels are knitted up in the same way as the back, starting at the rib and working up through stockinette and seed stitches.
ARMS
Okay, onto the arms! You'll need two of these too! 😊
Now for these we start from the top of the arm and work down. We knit this piece flat just like the front and back.
Using your 15mm needles, you'll start with the allocated rows of seed stitch for the first section of the sleeve, then switch and do rows of stockinette stitch.
Okay, now before we get to the ribbed cuff we need to decrease some stitches so the sleeve tapers nicely. We do this by knitting two stitches together. So first knit your 2 (3,3) stitches, then we're going to start knitting two together. It's really easy, you just pick up 2 stitches with your right needle instead of the normal one, and then knit the stitches as you normally would.
Once that’s done you swap to the 10mm needles and start your rib stitch.
💡 When you cast off make sure it’s not too tight otherwise you’ll have a really tight wrist hole.
SEWING IT TOGETHER
Now it’s time to get to work with the darning needle to sew your masterpiece together. We lay our pieces flat and sew them together one by one.
Step 1: lay your front and back pieces on a flat surface, the right sides facing you.
Step 2: Sew the shoulder panels together using the invisible seam technique, and leaving the hole in the middle for the open front of the cardi.
Step 3: Time to attach the sleeves to the body. Make sure the middle of your sleeve is lined up with the shoulder seam. This will ensure the seam of your sleeve is right under your armpit, not half way around your arm! Once you've made sure it's all lined up, sew the sleeves to the shoulders.
Step 4: Fold your cardi in half long ways with the wrong sides facing each other, we're going to sew it together using a Mattress Stitch, from the arm cuff all the way up the arm to the arm pit, then down the side seam to the bottom of your jumper. And then repeat this on the other side.
💡 It's normal for the wool to get a bit shabby as you go, so we recommend using a few pieces and tying them together underneath as you go!
We've included handy videos below for both the invisible seam and mattress stitch.
THE RIBBING
Okay guys almost done!!! The last part is to finish off the neckline. The neck is kitted in 1x1 rib stitch - you’ll be pretty good at this now!
Using your 10mm circular needles, pick up a stitch for every row along the raw neckline. You would have approximately 110 (114, 118) stitches on your needle in equal spacing around the neckline. It will be a bit of a squishy fit on the needle but that's okay!
We're going to do 4 rows of 1x1 rib stitch, knitting back and forth. Once that's done, you cast off those stitches and you're so close to popping that bad boy on!
The last thing we do for every piece is weave in the ends. That’s basically just tidying up the piece so all loose ends are trimmed down and tucked into the back of your work. You use the seams here to weave those ends in so they are nicely hidden away.
A final tip to keep in mind.
You'll need to change your wool balls at points in the process - when you finish one ball and starting another. If you’re just starting a new ball of the same colour then the best method for beginners is when you've got about 20cm of wool left on your current ball, you incorporate the tail from the new ball into your next stitch. You do this by starting your next stitch with your new tail and knitting on with that new ball, making sure the loose ends for both balls are on the wrong side/inside of your knit. Then all you need to do is tie the two ends together in a knot.
VIDEOS FOR A BIT OF EXTRA HELP!
Don't worry, YouTube was our best friend when we taught ourselves how to knit.
Here are some videos that should be helpful but feel free to go searching for your own. There are a number of techniques people use for a lot of the common stitches in knitting so there's no one right way.
Find what works for you! If you get stuck, reach out to us and we'll give you a hand! 😎
Testing your gauge
Casting On
Knit Stitch
Purl Stitch
1x1 Rib Stitch
Stockinette Stitch
Decrease a stitch
Casting Off
Changing colours
Sewing together


